JColorChooser
Package :
Class:
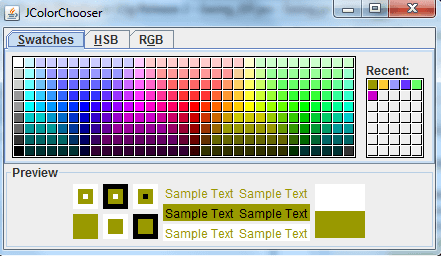
Note :JColorChooser class used to add interactive color choice to a container.
Javax.swing
Class:
javax.swing.JColorChooser
Note :JColorChooser class used to add interactive color choice to a container.
| Constructors | Description |
|---|---|
JColorChooser()
|
This constructor creates a JColorChooser instance with an initial selection of white. |
JColorChooser(Color InitialSelection)
|
This Constructor creates a JColorChooser instance with a designated initial selection. |
| Method | Description |
|---|---|
Color getColor() |
This method returns the selected color. |
void setColor (Color C)
|
This method sets the current color of the color chooser to the specified color. |
Example :
package client;

import java.awt.Dimension;
import javax.swing.JColorChooser;
import javax.swing.JFrame;
import javax.swing.JPanel;

public class Frame1 extends JFrame
{
	public Frame1()
	{
		setTitle("JColorChooser");
		JColorChooser cc=new JColorChooser();
		JPanel content=(JPanel)getContentPane();
		content.add(cc,"Center");
	}
	private void jbInit() throws Exception
	{
		this.getContentPane().setLayout( null );
		this.setSize( new Dimension(400, 300) );
	}
	public static void main(String args[])
	{
		Frame1 frame=new Frame1();
		frame.setVisible(true);
	}
}
Output :
JFileDialog
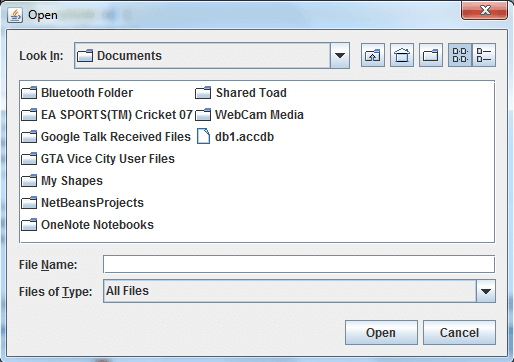
JFileChooser to make an open file dialog box and a save file dialog
box. It gives return value of the three methods :
- JFileChooser.CANCEL_OPTION, if the user clicks Cancel.
- JFileChooser.APPROVE_OPTION, if the user click an OK/Open/Save button.
- JFileChooser.ERROR_OPTION, if the user closes the dialog.
FileFilter class.FileSystemView classFileView.
FileFilter class :
FileFilter class used for restricting files and directories which is listed in the FileView of the JFileChooser.FileSystemView class :
The FileView controls how the directories and files are listed within the JFileChooser.FileView :
The FileSystemView is an abstract class that tries to hide file system-related operating system specifics from the file chooser.Example :
package client;

import java.awt.Dimension;
import java.io.File;
import javax.swing.JFileChooser;
import javax.swing.JFrame;

public class Frame2 extends JFrame
{
	String filename = File.separator + "tmp";
	JFileChooser filechooser = new JFileChooser(new File(filename));
	File file = fc.getSelectedFile();
	public Frame2()
	{
		try
		{
			jbInit();
		}
		catch (Exception e)
		{
			e.printStackTrace();
		}
	}
	private void jbInit() throws Exception
	{
		this.getContentPane().setLayout( null );
		this.setSize( new Dimension(400, 300) );
		filechooser.showOpenDialog(null);
		filechooser.showSaveDialog(null);
		file = fc.getSelectedFile();
	}
	public static void main(String args[])
	{
		Frame2 frame=new Frame2();
		frame.setVisible(true);
	}
}
Output :
JToogle Button
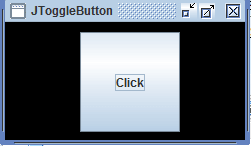
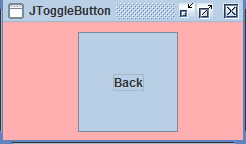
- JToggle button,when goes to the inward push state as long as the user has pressed the left mouse key and when he free the left mouse key,the button comes to its normal state.
- To create a toggle button,so invoke the constructor and supply the label name.
- Toggle class takes the image icon along with the label name.
Example :
import javax.swing.*;
import java.awt.Color;
import java.awt.event.ItemListener;
import java.awt.event.ItemEvent;

public class Frame1 implements  ItemListener
{
	JToggleButton toggle;
	JPanel GUI;
	public JPanel createContentPane ()
	{
		GUI = new JPanel();
		GUI.setBackground(Color.black);
		GUI.setLayout(null);
		toggle= new JToggleButton("Click");
		toggle.setLocation(75,10);
		toggle.setSize(100,100);
		toggle.addItemListener(this);
		GUI.add(toggle);
		GUI.setOpaque(true);
		return GUI;
	}
	public void itemStateChanged(ItemEvent e)
	{
		if(e.getStateChange() == ItemEvent.SELECTED)
		{
			toggle.setText("Back");
			GUI.setBackground(Color.pink);
		}
		else
		{
			toggle.setText("Click");
			GUI.setBackground(Color.black);
		}
	}
	private static void createAndShowGUI()
	{
		JFrame.setDefaultLookAndFeelDecorated(true);
		JFrame frame = new JFrame("JToggleButton");
		//Create and set up the content pane.
		Frame1 demo = new Frame1();
		frame.setContentPane(demo.createContentPane());
		frame.setDefaultCloseOperation(JFrame.EXIT_ON_CLOSE);
		frame.setSize(250, 150);
		frame.setVisible(true);
	}
	public static void main(String[] args)
	{
		SwingUtilities.invokeLater(new Runnable()
		{
			public void run()
			{
				createAndShowGUI();
			}
		});
	}
}
Output :
JMenuBar
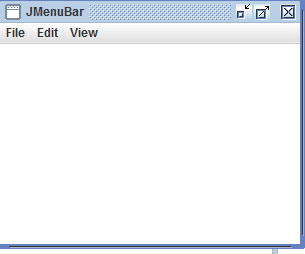
- JMenu can be nested within a menu to provide sub-menus.
- JMenuBar is placed on the top of MenuBar in the JFrame.
- Dropdowns within that menubar are JMenu objects (such as File, Edit).
Example :
import javax.swing.*;
import javax.swing.event.*;
import java.awt.*;
import java.awt.Color;
import java.awt.event.*;

// Class implements three different types of listener.

public class Frame1
{
	public JPanel createContentPane()
	{
		JPanel totalGUI = new JPanel();
		totalGUI.setBackground(Color.white);
		totalGUI.setMinimumSize(new Dimension(300, 200));
		totalGUI.setPreferredSize(new Dimension(300, 200));
		totalGUI.setMaximumSize(new Dimension(300, 200));
		totalGUI.setOpaque(true);
		return totalGUI;
	}
	public JMenuBar createMenuBar()
	{
		//Create the menu bar.
		JMenuBar menuBar = new JMenuBar();
		//Add a JMenu
		JMenu ff= new JMenu("File");
		JMenu ee = new JMenu("Edit");
		JMenu vv = new JMenu("View");
		menuBar.add(ff);
		menuBar.add(ee);
		menuBar.add(vv);
		JMenuItem File = new JMenuItem("save");
		JMenuItem Edit = new JMenuItem("saveas");
		JMenuItem View = new JMenuItem("open");
		ff.add(File);
		ff.add(Edit);
		ff.add(View);
		JMenuItem font =  new JMenuItem("font");
		JMenu source = new JMenu("source");
		JMenuItem path= new JMenuItem("path");
		source.add(path);
		source.add(path);
		ee.add(font);
		ee.add(source);
		//  display the CheckBoxMenuItem
		// and another SubMenu with more CheckBoxes in it.
		JCheckBoxMenuItem properties = new JCheckBoxMenuItem("properties");
		JCheckBoxMenuItem application = new JCheckBoxMenuItem("Applicatio");
		JMenu Team = new JMenu("Team");
		JCheckBoxMenuItem chat = new JCheckBoxMenuItem("Chat");
		JCheckBoxMenuItem video = new JCheckBoxMenuItem("Video");
		Team.add(chat);
		Team.add(video);
		vv.add(properties);
		vv.add(application);
		vv.add(Team);
		return menuBar;
	}
	private static void createAndShowGUI()
	{
		JFrame.setDefaultLookAndFeelDecorated(true);
		JFrame frame = new JFrame("JMenuBar");
		//Create and set up the content pane.
		Frame1 demo = new Frame1();
		frame.setContentPane(demo.createContentPane());
		// set the MenuBar of the Frame to our MenuBar
		frame.setJMenuBar(demo.createMenuBar());
		frame.setDefaultCloseOperation(JFrame.EXIT_ON_CLOSE);
		frame.pack();
		frame.setVisible(true);
	}
	public static void main(String[] args)
	{
		//creating and showing this application's GUI.
		SwingUtilities.invokeLater(new Runnable()
		{
			public void run()
			{
				createAndShowGUI();
			}
		});
	}
}
Output :
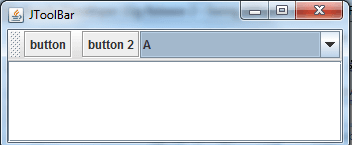
JToolBar
- JToolBar used to create a toolbar.
- It is a bar to which some component can be attached.
- Create a toolbar :
- Creates a tool bar with HORIZONTAL orientation.
- Orientation is 0 for HORIZONTAL orientation and 1 for VERTICAL orientation.
JToolBar tb=new ToolBar();
JToolBar tb=new JToolBar(int Orientation);
JToolBar tb=new JToolBar(String str,int Orientation);
Example :
import java.awt.BorderLayout;
import java.awt.Container;
import javax.swing.JButton;
import javax.swing.JComboBox;
import javax.swing.JFrame;
import javax.swing.JScrollPane;
import javax.swing.JTextArea;
import javax.swing.JToolBar;

public class ToolBarSample
{
	public static void main(final String args[])
	{
		JFrame frame = new JFrame("JToolBar Example");
		frame.setDefaultCloseOperation(JFrame.EXIT_ON_CLOSE);
		JToolBar toolbar = new JToolBar();
		toolbar.setRollover(true);
		JButton button = new JButton("button");
		toolbar.add(button);
		toolbar.addSeparator();
		toolbar.add(new JButton("button 2"));
		toolbar.add(new JComboBox(new String[]{"A","B","C"}));
		Container contentPane = frame.getContentPane();
		contentPane.add(toolbar, BorderLayout.NORTH);
		JTextArea textArea = new JTextArea();
		JScrollPane pane = new JScrollPane(textArea);
		contentPane.add(pane, BorderLayout.CENTER);
		frame.setSize(350, 150);
		frame.setVisible(true);
	}
}
Output :